
This article will cover how we go about using RESTful APIs in Swift: we’ll start by covering what a RESTful API actually is and move on to cover how we go from knowing we have one of these things available to actually being able to use it in our apps.
The article is will not go into every detail, and beyond that, I’ll try to expand and clarify it over time, so please leave comments and feedback.
Prerequisites: You should be familiar with the basic of the Swift programming language. For the use of 3-rd party libraries familiarity with use Cocoapods in Xcode is useful.
Part I: The Background of REST and RESTful APIs
What is REST?
REST (Representational State Transfer) is an architectural style for designing distributed systems. It is not a standard but a set of constraints, such as being stateless, having a client/server relationship, and a uniform interface. REST is not strictly related to HTTP, but it is most commonly associated with it.
“By using a stateless protocol and standard operations, RESTful systems aim for fast performance, reliability, and the ability to grow, by re-using components that can be managed and updated without affecting the system as a whole, even while it is running” (Wikipedia).
History of REST
The full version of REST was actually only defined in the relatively recent past – by Roy Fielding in 2000 in his doctoral dissertation. However, the principles embodied in REST started much earlier with the “HTTP object model” beginning in 1994, and were instrumental in the design of both the HTTP 1.1 and Uniform Resource Identifiers (URI) standards.

For example, in the “Hypertext Transfer Protocol — HTTP/1.0” document, Tim Berners-Lee, Fielding, & Frystyk mention GET, HEAD, and POST and what these should be used for (with PUT and DELETE also being mentioned in the appendix). So, as we can see, the majority of what we think off as part of the usual set of REST keywords, and indeed the general approach, were seen as part of earlier standards and are now thus part of the DNA of REST.
Principles of REST
- Resources expose easily understood directory structure URIs.
- Representations transfer JSON or XML to represent data objects and attributes.
- Messages use HTTP methods explicitly (for example, GET, POST, PUT, and DELETE).
- Stateless interactions store no client context on the server between requests. State dependencies limit and restrict scalability. The client holds the session state.
HTTP methods
We use HTTP methods to map CRUD (create, retrieve, update, delete) operations to HTTP requests. As we know, these operations are the things we typically use with our SQL databases including MySQL and Core Data implementations. The below table clarifies how we can think about the equivalencies:
| Operation | SQL | HTTP | RESTful | DDS |
|---|---|---|---|---|
| Create | INSERT | PUT / POST | POST | write |
| Read (Retrieve) | SELECT | GET | GET | read/take |
| Update (Modify) | UPDATE | PUT / POST / PATCH | PUT | write |
| Delete (Destroy) | DELETE | DELETE | DELETE | dispose |
(Source: Wikipedia)
GET
GET requests are for Retrieving Information.
GET requests must be safe and idempotent, meaning regardless of how many times it repeats with the same parameters, the results are the same. They can have side effects, but the user doesn’t expect them, so they cannot be critical to the operation of the system. Requests can also be partial or conditional.
Retrieve an address with an ID of 1:
|
1 2 |
GET /addresses/1 |
POST
Request that the resource at the URI does something with the provided entity. Often POST is used to create a new entity, but it can also be used to update an entity.
Create a new address:
|
1 2 |
POST /addresses |
PUT
Store an entity at a URI. PUT can create a new entity or update an existing one. A PUT request is idempotent.
Idempotency is the main difference between the expectations of PUT versus a POST request.
Modify the address with an ID of 1:
|
1 |
PUT /addresses/1 |
N.B. PUT replaces an existing entity – If only a subset of data elements is provided, the rest will be replaced with empty or null.
PATCH
Update only the specified fields of an entity at a URI. A PATCH request is neither safe nor idempotent (RFC 5789). That’s because a PATCH operation cannot ensure the entire resource has been updated.
|
1 2 |
PATCH /addresses/1 |
DELETE
Request that a resource be removed; however, the resource does not have to be removed immediately. It could be an asynchronous or long-running request.
Delete an address with an ID of 1:
|
1 2 |
DELETE /addresses/1 |
HTTP Status Code Definitions
Status codes get returned to us (the client) from the remote server as the result of a request. These status codes indicate the result of the HTTP request. There are five classes of status code as follows:
1XX – Informational
2XX – Success
This class of status code indicates that the client’s request was successfully received, understood, and accepted.
3XX – Redirection
Examples include: 301 Moved Permanently which is a pretty common one demoting the fact that the URI of the resource which was requested has been permanently changed.
4XX – Client Error
Many codes in this category, a few common ones are: 401 Unauthorized and 403 Forbidden
5XX – Server Error
Response status codes beginning with the digit “5” indicate cases in which the server is aware that it has erred or is incapable of performing the request.
For a full list of status codes, see here
HTTP Headers and Media types
The Accept and Content-Type HTTP headers can be used to describe the content being sent or requested within an HTTP request.
The client may set Accept to application/jsonif it is requesting a response in the JSON format.
When sending data, the client can set the Content-Type to, for example, application/xml telling the client that the data being sent to it will be in the XML format.
RESTful API Aspects
Web service APIs that adhere to the REST architectural constraints are called RESTful APIs. HTTP-based RESTful APIs are defined with the following aspects:
- Base URI, such as “https://reqres.in/api/users”
- Standard HTTP Method (e.g., GET, POST, PUT, PATCH and DELETE)
- Media Type that defines state transition data elements (e.g., Atom, microformats, application/vnd.collection+json etc.). The current representation tells the client how to compose requests for transitions to all the next available application states. This could be as simple as a URI or as complex as a Java applet.
(Ref#: C)
Part II: Implementing RESTful API Code in Swift
Dynamic and Asynchronous Networking
Before we go into implementation details let confirm our understanding with regards to networking always being asynchronous and our UI updates always being done on the main thread:
“A device’s network environment can change at a moment’s notice. There are a number of simple (yet devastating) networking mistakes that can adversely affect your app’s performance and usability, such as executing synchronous networking code on your program’s main thread, failing to handle network changes gracefully, and so on. You can save a lot of time and effort by designing your program to avoid these issues to begin with instead of debugging it later” (Ref#: M).
When we are doing UI work as a result of networking information coming back (or not if there happens to be an error) we naturally must do this back on the main thread. We achieve this by using everything from running UI code (inside a block dispatching onto main asych queue using GCD) in the didSet method of parameters in our ViewControllers, to using alternatively using Promises (with something like PromiseKit), or Rx based solutions (with RxCocoa & RxSwift). We might indeed want to make our whole networking approach to be Functional using Futures & Promises as John Sundell has shown or indeed the whole project could go towards an Rx approach.
Sometimes it can be useful to use a Reachability checking class, this can monitor the phones current ability to connect to the internet, and what network (wifi / or 4G) it is using. A framework like this can be the answer so this can be worth investigating but we won’t cover more detail on Reachability in this article for now. An example of this is checking what the phone reachability status is before making a network call, or even canceling an existing networking task when the phones network status changes.
Using RESTful APIs in Swift
To use RESTful APIs in Swift there we actually have a few options (which we will now briefly cover), these do include the more traditional methods, and indeed newer more functionally oriented approaches.
Natively with URLRequest / URLSession
What is URLSession?
URLSession can be regarded as being both a class and a suite of classes designed for the handling of HTTP/HTTPS requests.
Elaborating on this: URLSession is used as the principal object responsible for sending and receiving HTTP requests.
When we are creating a URLSession we use aURLSessionConfiguration object, which allows the following 3 configuration options:
.default: uses the disk-persisted global cache, credential and cookie storage objects.ephemeral: like default but “private” since all session-related data is stored in memory.background: allowing the session to perform upload or download tasks in the background which means that transfers can actually continue even when the app is suspended or terminated by iOS.
"URLSessionConfiguration also lets you configure session properties such as timeout values, caching policies and additional HTTP headers” (Ref: F).
URLSession largely replaces the functionality of the now deprecated NSURLConnection, but it is more flexible with support for per-session cache, protocol, and credential policies, as well as background downloads and a number of other changes (Ref#: P).
What is a URLSessionTask?
URLSessionTask is an abstract class which denotes a task-object. Each session will create one or more tasks that do the actual work of fetching data, downloading files, or uploading files. “The URLSession class is the base class for tasks in a URL session. Tasks are always part of a session; you create a task by calling one of the task creation methods on a URLSession instance. The method you call determines the type of task” (apple docs).
There are three flavors of concrete session tasks (concrete subclasses of URLSession:
URLSessionDataTask: HTTP GET requests retrieving data from servers to memory.URLSessionUploadTask: upload a file from disk to a remote service, most often done using a POST or PUT HTTP Method.URLSessionDownloadTask: download a file from a remote service into a temporary local file location. When you use download tasks in background sessions, these downloads continue even when your app is suspended or is otherwise not running.
You can suspend, resume and cancel these session tasks, and additionally, a URLSessionDownloadTask can actually be paused and then resumed at a later point in time.
URLSessionTask Delegate Behavior
When you use a download task, you can use the delegate methods from the URLSessionTaskDelegate protocol (or the extras in the URLSession protocol or the URLSession protocol when relevant).
The delegate we set will receive several callbacks unique to download scenarios.
urlDuring a download, the session periodically calls the delegate’s method with status information (Periodically informing the delegate about the download’s progress).Session(_: download Task: did Write Data: total Bytes Written: total Bytes Expected To Write:) urlTells the delegate that a download task has finished downloading. In this method or completion handler – you must either open the file for reading or move it to a permanent location in your app’s sandbox container directory.Session(_: download Task: did Finish Downloading To:) urlThe session calls this method on successful completion. UnlikeSession(_: task: did Complete With Error:) URLSessionorData Task URLSession, a download task reports server-side errors reported through HTTP status codes into correspondingUpload Task NSErrorobjects.
However, the URLSession API also supports a simpler interface that does not use a delegate but uses a completion handler instead (with the request). This non-delegate approach is actually by far the most common approach for our handling of the response data these days, so that’s what we will see in our examples.
Aside on Retain Cycles: With the delegation pattern we will always want to make sure our delegating object has only a weak reference to the delegate. When we use an approach with completion handlers we must note that by default the completion block/closure will have a strong reference to the objects it references which is something that can absolutely end up leading to retain cycles, so inside our closures in swift we have the option of using a capture list to weakify our reference to self. See my article here for more details.
Overview of JSON
JSON stands for JavaScript Object Notation and is a common format for communicating data between different systems (principally on the internet). It uses a limited number of data types in order to keep things fairly simple; these data types include string, bool, arrays, object/dictionary, number, and null. JSON is derived from JavaScript, the JSON format having been originally specified as a separate standard in the 2000s but with competing versions of the standard. However, I-JSON (short for “Internet JSON”), proposed in 2015, “is a restricted profile of JSON designed to maximize interoperability and increase confidence that software can process it successfully with predictable results” (RFC 7493). These days JSON has become a language-independent format with many programming languages and their associated libraries supporting conversions to and from this format from there own data-types.
N.B. Whilst formats like XML are also quite widely used (and we see this in the REST standard), in the case of most RESTful APIs, it’s by far the most common approach to use the JSON format for serving information to client applications, therefore all our examples in this article assume JSON as the format for information interchange. Two reasons why the JSON format tends to be preferred is that JSON can be parsed by the same parser as JavaScript(JS), and it can also prove to be lighter weight than XML.
An example piece of JSON looks like this:
|
1 2 3 4 5 6 7 8 9 10 11 12 13 14 15 16 17 18 19 20 21 22 23 24 25 26 |
{"widget": { "debug": "on", "window": { "title": "Sample Konfabulator Widget", "name": "main_window", "width": 500, "height": 500 }, "image": { "src": "Images/Sun.png", "name": "sun1", "hOffset": 250, "vOffset": 250, "alignment": "center" }, "text": { "data": "Click Here", "size": 36, "style": "bold", "name": "text1", "hOffset": 250, "vOffset": 100, "alignment": "center", "onMouseUp": "sun1.opacity = (sun1.opacity / 100) * 90;" } }} |
Decoding JSON
On the side of the Swift code in our apps, we need to implement some method of converting between the JSON data, and our locally defined objects. In the past, we might have relied on the JSONSerialization class to do this, but these days we typically take advantage of Codable types for our data layer, and we use these with JSONEncoder and JSONDecoder classes.
Of the third-party libraries used for this purpose, the most well know is probably SwiftyJSON and it used to be the most commonly adopted approach to use this alongside Alamofire for networking in Swift. These days the native libraries are now more common, but as we will see later, Alamofire 5 looks to support Codable types in order to get closer to the direction the native framework has gone in (using the new .responseJSONDecodable).
We’ll see a full implementation using the above later in this article.
The Native Networking Classes & Their Implementation
The URL Class
The URL class can represent both local or remote URIs and therefore it can be anything from a local file accessed on the device represented starting with the prefix “file:///…” to a remote HTML webpage resource like “https://apple.com”.
One pa initializer which is already built into the URL class takes a string and returns an Optional URL (URL?), which means that we either need to force unwrap it or use conditional binding in order to then use it. As we never really want to force unwrap if we can help it, a syntax like this makes sense (in the below line of code, if an error were to be more likely we would also want to add error handling in our else block).
|
1 |
guard let someUrl = URL(string: "https://apple.com") else { return } |
Constructing Our URL using URLComponents
“While the Swift standard library’s URL type allows us to create a URL value using a string, a more robust option is usually to use URLComponents. That’ll let us construct the various parts of a URL in steps, and then use the components’ url property to build the URL we need”(Ref#: U). In fact, URLComponents complies with the RFC3986 standard, and it looks to allow you to parse URLs into, and construct URLs from, constituent parts in a way that complies with this standard.
RFC3986 Abstract: “A Uniform Resource Identifier (URI) is a compact sequence of characters that identifies an abstract or physical resource. This specification defines the generic URI syntax and a process for resolving URI references that might be in relative form, along with guidelines and security considerations for the use of URIs on the Internet. The URI syntax defines a grammar that is a superset of all valid URIs, allowing an implementation to parse the common components of a URI reference without knowing the scheme-specific requirements of every possible identifier. This specification does not define a generative grammar for URIs; that task is performed by the individual specifications of each URI scheme” (Source: https://tools.ietf.org/html/rfc3986).
So applying this in Swift currently looks something like this:
|
1 2 3 4 5 |
var components = URLCompoments() components.scheme = "https" components.host = "reqres.in" components.path = "/api/users" guard let url = components.url else { preconditionFailure("Failed to construct URL") } |
Arguably this could be a more robust approach (particularly when we have many URLs with the same root for example), but there are indeed other ways to construct URI apart from using URLComponents.
It can, therefore, be a good idea to construct and parse URL using this helper class, and indeed, this can also help with things like Unit Testing where we may, for example, have a test endpoint as well as a live one, or where we using multiple URIs with the same base URL in our project (Ref#: X).
URLRequest
The first thing we might want to do regardless of which of the HTTP methods were trying to use is to define a URLRequest with a given URL (which we have previously constructed using URLComponents).
|
1 |
let request = URLRequest(url: url) |
For any of the networking approaches we cover in this article, it is common practice to use JSON data for both requests and responses, although we can also make use of XML.
Set The Media Types
We have the option at this point in creating our GET request to define our media types by using headers (as we saw above). However, this may not be needed if the default types are what we want already, yet it is likely best practice indeed to explicitly specify these. If we aren’t sending content it’s most likely that we won’t need to set the “Content-Type” header.
|
1 2 3 4 5 |
// Recall this is the type of data that we *may* be sending request.setValue("application/json", forHTTPHeaderField: "Content-Type") // ...and recall this specifies the type we want back request.setValue("application/json", forHTTPHeaderField: "Accept") |
Formulate Our GET Request Using URLSession
Our request method for our URLRequest will always default to a GET request so we don’t need to explicitly stipulate this (such as by setting request.httpMethod = "GET") when we want to use GET.
In a real-world context where we would likely be using some helper method to construct our request inside our networking layer, we may always have the request’s httpMethod specified explicitly for consistency.
So now all we need to do is:
|
1 2 3 4 5 |
let task = URLSession.shared.dataTask(with: request) { data, response, error in // Handle data, response, and error here... } task.resume() |
…and then we will be handling the data, response, and error inside this task. Both the task, and the definition of request, and so on, will typically sit inside a function to which we will have passed a completion handler, and inside of the task is where we reference then the completion block passing back either the parsed data or an error.
Example Real-World Use Case (with Swift 5’s Result Type)
SE-0235 introduced a Result type into the standard library. This gives us a (potentially) simpler, clearer way of handling errors in complex code such as asynchronous APIs (networking).
This changes the way we typically use completion handlers with our networking code.
To elaborate on that a bit more, Swift’s Result type is actually an enum with two cases: success, and failure. Because both are coded using Generics they can have an associated value, however, in each case, the value of failure needs to conform to the Error type. This use case example of a function in our Network Layer which aims to download and parse some Codable type (called Fruits) from some remote JSON data:
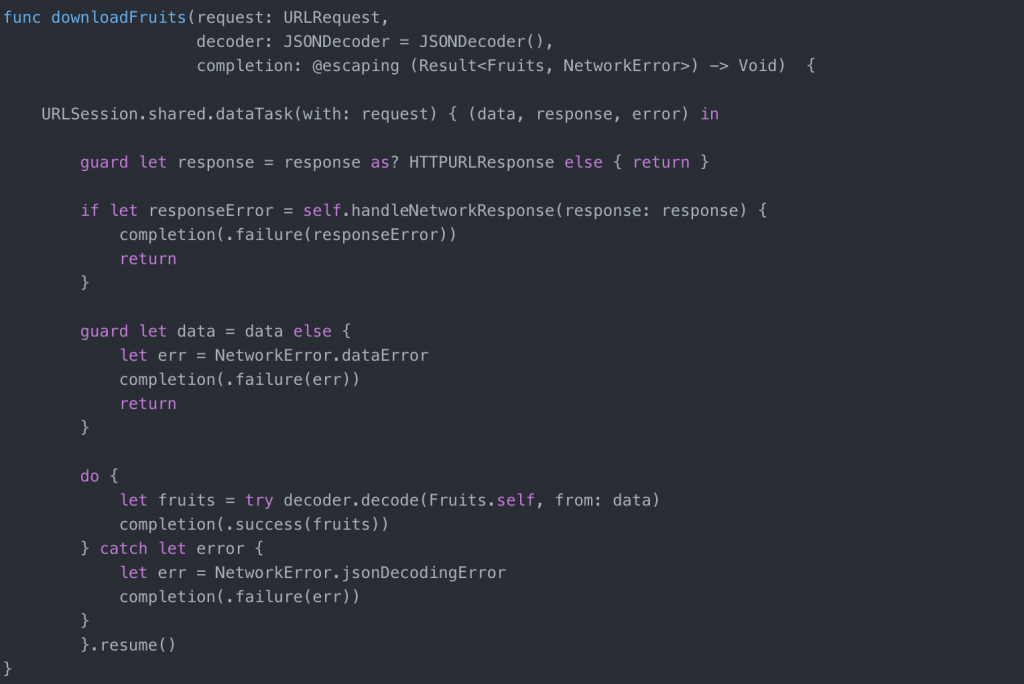
Whilst this might not be the most complete implementation it gives us a general idea of the type of way we could use Native Networking after creating our URL.
The above assumes the use of some separate function for decoding the meaning of response status codes, something like this:
|
1 2 3 4 5 6 7 8 9 10 |
private func handleNetworkResponse(response: HTTPURLResponse) -> NetworkError? { switch response.statusCode { case 200...299: return (nil) case 300...399: return (NetworkError.redirectionError) case 400...499: return (NetworkError.clientError) case 500...599: return (NetworkError.serverError) case 600: return (NetworkError.invalidRequest) default: return (NetworkError.unknownError) } } |
We’re also using some error enum like this:
|
1 2 3 4 5 6 7 8 9 10 11 |
public enum NetworkError: String, Error { case missingUrl = "URL is nil" case parametersNil = "Parameters were nil." case encodingFailed = "Parameter encoding failed." case redirectionError = "Redirection error" case clientError = "Client Error" case serverError = "Server Error" case invalidRequest = "Invalid Request" case unknownError = "Unknown Error" case dataError = "Error getting valid data." } |
Formulate a POST Call Using URLRequest and URLSession
If we want to compost a POST we might want to modify our request like this:
|
1 2 3 4 5 6 |
// For HTTP Headers and Media Types as covered above, we can set these thus: request.setValue("application/x-www-form-urlencoded", forHTTPHeaderField: "Content-Type") // We set our HTTP Method, again as detailed above, we can set this thus: request.httpMethod = "POST" |
before progressing to define the parameters we want to send:
|
1 2 3 4 5 |
let parameters: [String: Any] = [ "name": "Steve", "job": "iOS Developer" ] request.httpBody = parameters.percentEscaped().data(using: .utf8) |
*the above code takes advantage of the extensions here
Then we could do something like this:
|
1 2 3 4 5 6 7 8 9 10 11 12 13 14 15 16 17 18 |
let task = URLSession.shared.dataTask(with: request) { data, response, error in guard let data = data, let response = response as? HTTPURLResponse, error == nil else { // check for networking error print("error", error ?? "Unknown error") return } guard (200 ... 299) ~= response.statusCode else { // check for http errors print("statusCode should be 2xx, but is \(response.statusCode)") return } let responseString = String(data: data, encoding: .utf8) print("responseString = \(responseString ?? "")") } task.resume() |
Running the above code will give us an output of:
![]()
In the example above, instead of printing out errors, in the real world we’d be calling the completion block which had been passed into the function containing our networking code, and passing it a particular NSError(Error) which could then be handled in the part of the app which was using the networking functionality.
Error Handling
It worth remembering that your networking implementation should incorporate proper error handling. Where we use completion handlers, we want our networking code to pass back some meaningful error into the completion block/closure at the point in the app that the networking result it to be used.
When creating our networking layer, we will typically create an enum listing out all the expected possible errors that could happen, or alternatively, we might use an extension on the NSError that looks something like this which creates a class of error where we can also provide a description.
Approach A:
Create an enum encoding all the expected types of error we might expect to see:
|
1 2 3 4 5 |
public enum NetworkError: String, Error { case parametersNil = "Parameters were nil." case encodingFailed = "Parameter encoding failed." case missingURL = "URL is nil." } |
Approach B:
Create an extension on NSError allowing us to classify different groups of Errors, but also provide a description for each as we instantiate it.
|
1 2 3 4 5 6 7 8 9 10 11 12 13 14 |
import Foundation extension NSError { // Networking Errors private static let NetworkingDomain = "NetworkingError" private static let NetworkingErrorCode = -550 static func networkingError(description: String) -> NSError { return NSError(domain: NetworkingDomain, code: NetworkingErrorCode, userInfo: ["description" : description]) } // Other Error types would go here ... } |
Then, within our network functions, when the call our completion block we can pass back a specific error (if one is not given to us by the networking methods) and handle that error in our completion block such as by showing an error to the user’s screen.
Using Codable Types with JSONDecoder & JSONEncoder
This is the currently in vogue and most common approach to use in newer versions of Swift and has been ever since the introduction of Codable Types to the language:
Example Programming Process A:
Getting and Parsing Some Remote (JSON) Data
Step One: Either refer to your APIs documentation (if it exists), or use a service like https://app.quicktype.io/ in combination with some manual adjustments (note that it’s important to ensure your model objects allow for the full range of possible API responses) and checking to generate Codable types conforming to the structure of the remote JSON data.
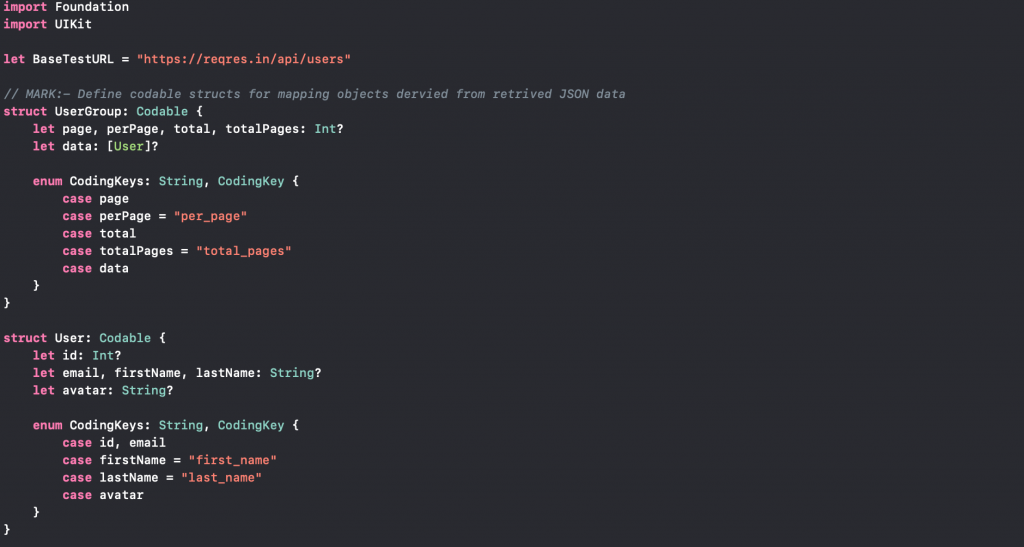
*in the above case, we make use of CodingKeys to go from snake case variable names to the Swift standard camel case naming convention.
Step Two: Write a function (typically using a completion handler) to try and get then parse the remote data using JSONDecoder (the below code might sit within some networking class in our app)
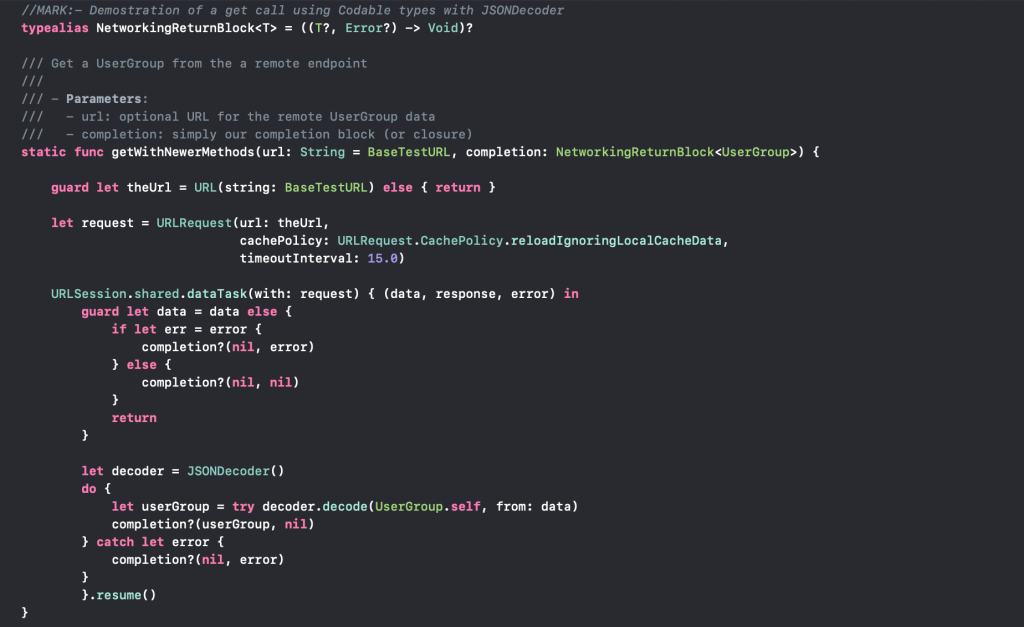
It would then be for the code in our completion handler to deal with any valid UserGroup data, or handle cases where there is an error returned.
Caching
One thing we have not highlighted specifically yet in this article is the topic of Caching. Be aware that you are provided with caching options with your URLRequests and with URLSession (a custom session which is not the shared session allows us to configure more), and sometimes caching behavior will be influenced by cache headers returned from the server.
With a default session configuration, we’re actually using NSURLCache.sharedCache for our URLCache.
The following can then be happening behind the scenes with regards to whether we actually try and fetch a new copy of a given resource for the previously fetched from endpoint:
”
- If a cached response does not exist for the request, the URL loading system fetches the data from the originating source.
- Otherwise, if the cached response does not indicate that it must be revalidated every time, and if the cached response is not stale (past its expiration date), the URL loading system returns the cached response.
- If the cached response is stale or requires revalidation, the URL loading system makes a HEAD request to the originating source to see if the resource has changed. If so, the URL loading system fetches the data from the originating source. Otherwise, it returns the cached response.
“(Ref#: S).
But if we specify a different cache policy (if we don’t use the .default session configuration we will get different behavior. Furthermore, if we specify a different cache policy in our URLRequest we will also get different behavior, like in the above example where we have requested .reloadIgnoringLocalCacheData meaning that we will always try to fetch a fresh copy regardless of other factors.
So as we have seen Caching Policies can be specified both in the request, but also in the response from the server (so cache headers can affect how our app is going to cache that given response). It is vital that we understand the desired caching behavior of our application with regards to a particular resource as not doing so can either make our app inefficient and a network hog, or make it behave incorrectly such as by having outdated information (but this is less likely).
Beyond the built-in cache methods, it is often desirable to create our own Caches in our apps, particularly with things like images loading into a tableview for example.
Use Alamofire
Alamofire is a Swift-based HTTP networking library that you can use with both iOS and macOS programming. It constitutes an interface built on top of Apple’s Foundation networking classes like URLSession, and it was designed to make it easier to carry out a number of common networking tasks. This library was wildly popular along with its Objective-C equivalent AFNetworking up until the last few years but it is now less popular.
The Alamofire framework was (in the past) perhaps the most widely used option when it came to simplifying networking and it allows us to readily and easily use a full range of HTTP methods including those common ones like GET, POST, PUT, PATCH.
In the opinion of many, the availability of Codeable protocol combined with URLSession and JSONDecoder has removed the vast majority of use cases for Alamofire (particularly where the preference of iOS developers might often be to reduce the number of dependencies).
Get Request Using Alamofire
A GET request using Alamofire can be simpler and cleaner, and (after we import Alamofire, having installed it’s current Cocoapod) the code could like like this in its simple form:
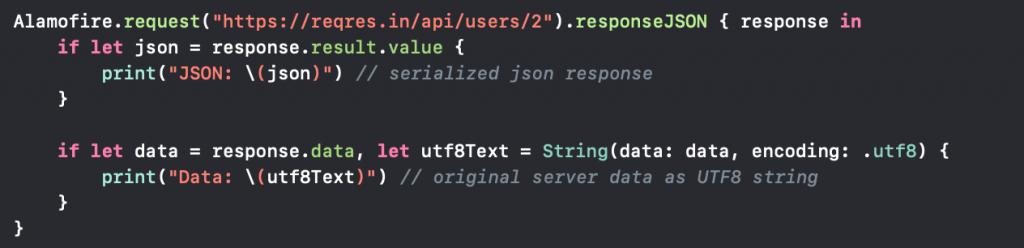
The console output of the above would be:

Of course, this code isn’t super useful in itself but goes to demonstrate the basic syntax involved. What we would likely do is to create a function to deserialize our JSON data such as by specifying particular keys to extract into particular properties of an object representing remote data.
To avoid having to write the inflexible manual deserialization Code we’d want to take advantage of Codable types by either using the new Foundation Swift classes (JSONEncoder && JSONDecoder) or using Alamofire 5:
Using Alamofire with Codable
So with Alamofire 4, it’s not so easy to use Codable types as with the current swift native methods. However, Alamofire 5 plans good support for Codable types as we will see.
One way to do this might be using an extension on JSONDecoder as outlined in the following article: https://grokswift.com/decodable-with-alamofire-4/
Therefore, as we can see, this version 4 of this library still lags behind in its support of Codable, however, Alamofire 5 brings in this support, looking something like this (where AF is the new shorthand for Alamofire):
 POST using Alamofire
 POST using Alamofire
A POST with Alamofire (in a simplified form) might look like this:
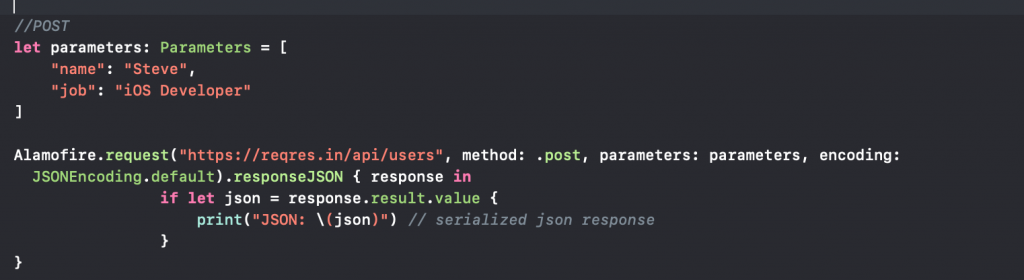
The output of which would is:

What About Using RxSwift?
Some of you may be asking, what about using RxSwift for our networking, after all, it’s considered a robust and flexible approach to asynchronicity in our Swift code. This is a good thought, and using RxSwift for our networking fits well into an overall approach to a given app which is Rx centered.
This approach (using Rx for iOS programming) has become increasingly popular in the last two years or so and it achieving strong adoption across the industry at this point.
One nice approach is using the elegance of Alamofire 5 in combination with RxSwift as outlined in this medium article (this again is taking advantage of the new Codable supporting features of AF 5 as mentioned above – note the syntax and other changes): https://medium.com/@marioamgad9/swift-4-2-building-a-network-layer-using-alamofire-and-rxswift-e044b5636d55
It could be also nice to combine the use of RxSwift for our networking, with the use of RxCocoa for a view that incorporates a UITableView – an approach which can create a really nice looking clean implementation, dispensing with the typical need for coding up the usual delegate and data-source members.
For a good breakdown of the whole topic, please see the following book from the Ray Wenderlich team.
Moya
Taking it a step further: Moya is another layer of abstracting away detail that is built on top of Alamofire to the extent that it aims to abstract away the “nitty-gritty” of things like URLs and parameters etc. Another advantage of Moya is that it comes with some build-in support for use with RxSwift.
Have a look at this Ray Wenderlich article for more details on using Moya for networking: https://www.raywenderlich.com/5121-moya-tutorial-for-ios-getting-started
Certificate Pinning?
One thing we might want to know is how easy it is to use extra features like certificate pinning using either native networking methods or an Alamofire based approach? Well for more details on this (since it’s slightly outside the scope of this article) see my certificate pinning article.
Well-Structured Networking Layer?
In this article we focused on the basic code needed to perform network requests for RESTful APIs in Swift, however, what you would probably want to do in your app’s code is to create a well-structured networking layer. This layer separates off the responsibility for handling networking into a set of classes whose responsibility is to manage all networking aspects for the app.
Typically we want to maximize our use of SOLID principles with regards to separation of responsibilities, but also using a facadé pattern which allows us to change up how we are doing our networking (whether that using the native methods or Alamofire for example) but without the rest of the app having to worry about the implementation details.
Typically we want to have something that prepares the request, another thing that does the call, and another thing that parses the data, and something that handles that callback to update the view. Having a structure like this for our apps Networking Stack will importantly not only help to make our apps more compliant with SOLID principles but it will also make the code more testable (meaning we can more readily mock elements of the networking stack and run unit tests against other parts).
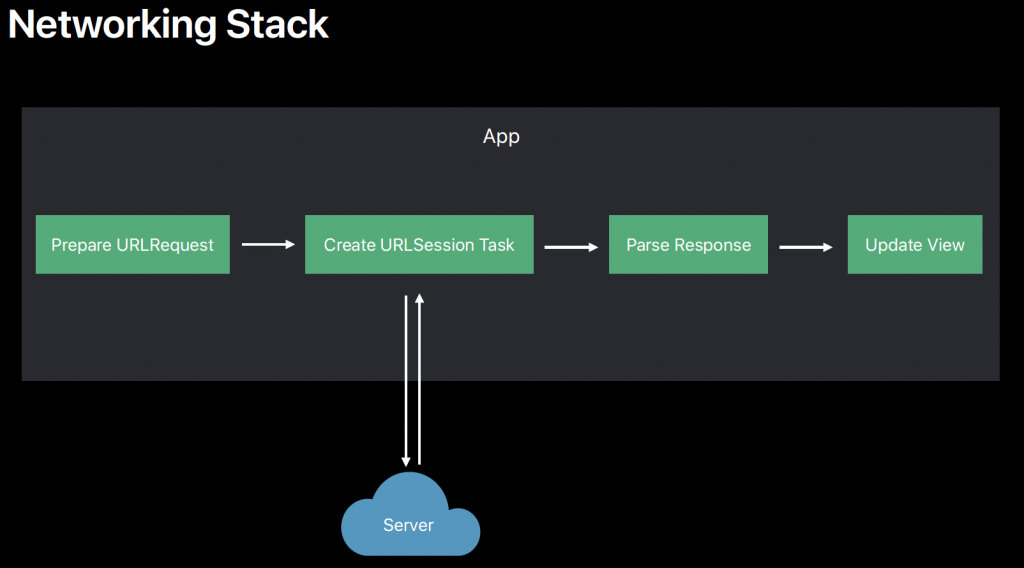
(SOURCE: Ref# L)
Let look at some examples of different approaches to building a networking layer:
Protocol Oriented Approach
Since Apple has pitched Swift as a protocol-oriented language, we know that the use of a protocol-oriented approach would be encouraged in Swift.
To achieve this we want to think about what kinds of things we want to use protocols for with our network layer.
Firstly we might want an EndPoint type which encodes the elements of that our URLRequest and URLSession will use to access a particular endpoint. Perhaps create our own Components protocol corresponding with the components used in URLComponents.
By creating something like a NetworkingService or NetworkingEngine protocol and populating it with the functions in our network engine, we should be able to fairly easily then create a mock networking service that might (for example) get it data locally instead of from the network and use this in our network or UI unit tests. Combining this with an approach of using Dependency Injection with our view controllers (and other objects) means we can test how different responses from mocked objects affect or view controllers for example.
The following articles (which I have linked here) go into more detail with a few different approaches to a protocol-oriented networking layer:
https://medium.com/swiftcairo/protocol-oriented-ios-network-layer-422575314cc2
https://www.natashatherobot.com/protocol-oriented-networking-in-swift/
Conclusion
In this article, we began by covering the basics of REST and what this means. We moved on to looking at RESTful APIs and we looked at how we go about using RESTful APIs in Swift by using the URLRequest and URLSession classes. We covered a few different ways that we can actually implement our local networking class or networking layer code either relying on native classes or taking advantage of third-party libraries and frameworks to potentially make our code cleaner and easier to read.
We briefly touched on creating a high-quality networking layer in our Swift application but did not cover this in detail since this was outside of the scope of the current article.
We mentioned that Rx is becoming a significantly more popular approach. We talked about how Alamofire is less popular than it once was but may make a comeback with things like Codable support in its fifth version. Beyond that we covered all the basic native classes from the Foundation framework that we use for Swift networking and mentioned how using completion handlers (including with the new Result type in Swift 5) is how we typically handle callbacks from the asynchronous code that networking uses. We, of course, mentioned that once back in our view, we need to use those completion blocks to run code that updates our UI back on our main thread.
References
A: https://www.ics.uci.edu/~fielding/pubs/dissertation/rest_arch_style.htm
B: https://spring.io/understanding/REST
C: https://en.wikipedia.org/wiki/Representational_state_transfer
D: https://www.ics.uci.edu/~fielding/pubs/dissertation/evaluation.htm
E: https://www.w3.org/Protocols/HTTP/1.0/spec.html
F: https://www.raywenderlich.com/567-urlsession-tutorial-getting-started
G: https://medium.com/@marioamgad9/swift-4-2-building-a-network-layer-using-alamofire-and-rxswift-e044b5636d55
H: https://www.youtube.com/watch?v=A0hoqSkyY7o
I: https://grokswift.com/alamofire-how-requests/
J: https://www.raywenderlich.com/5121-moya-tutorial-for-ios-getting-started
K: https://dzone.com/articles/write-your-own-network-layer-in-swift
L: https://developer.apple.com/videos/play/wwdc2018/417/
M: https://developer.apple.com/library/archive/documentation/NetworkingInternetWeb/Conceptual/NetworkingOverview/WorkingWithHTTPAndHTTPSRequests/WorkingWithHTTPAndHTTPSRequests.html#//apple_ref/doc/uid/TP40010220-CH8-SW1
N: https://digitalleaves.com/complete-guide-networking-in-swift/
O: https://appitventures.com/blog/testable-network-layer-in-swift-part-1/
P: https://www.objc.io/issues/5-ios7/from-nsurlconnection-to-nsurlsession/
Q: https://talk.objc.io/episodes/S01E25-adding-caching
R: https://www.keycdn.com/blog/http-cache-headers
S: https://qnoid.com/2016/04/10/A-primer-in-HTTP-caching-and-its-native-support-by-iOS.html
T: https://www.hackingwithswift.com/articles/126/whats-new-in-swift-5-0
U: https://www.swiftbysundell.com/basics/networking
V: https://www.swiftbysundell.com/posts/functional-networking-in-swift
W: https://www.youtube.com/watch?v=8UBlNPMZRuM
X: https://cocoacasts.com/working-with-nsurlcomponents-in-swift
Picture Credit: Phillie Whitehouse
Updated: 31st May 2019
![]()
Comments