
Unlocking the Power of Unit Testing in Software Development
Unit Testing is a method dedicated to validating each fragment, or “unit”, of software. This approach isn’t just about verifying if a class or a method operates correctly; it dives deep, scrutinising sets of modules, associated control data, usage procedures, and even operating procedures.
But what exactly constitutes a “unit”? While often synonymous with a class, a unit could be as granular as an individual method. This meticulous level of testing falls under the umbrella of component testing – where each component is tested in isolation, disregarding its relationship with others. This concept is closely tied to Module Testing, emphasising the discrete nature of each testable element.
However, the boundaries of unit testing can sometimes blur. Some developers expand the definition to encompass integration tests, which evaluate the interplay between multiple units or modules. While this might deviate from the strictest interpretation, it’s a testament to the versatility of unit testing.
The beauty of unit tests lies in their brevity. Typically crafted during the development phase, these concise code snippets can be influenced by the development approach, like Test-Driven Development (TDD). In TDD, the journey begins with the most basic test for a requirement, paired with its simplest implementation. As the software evolves, so do these tests.
The advantages of unit testing are many; not only do they act as a protective shield against codebase regressions but they also diminish the reliance on manual testing. By offering insights into elusive bugs and the origins of issues like memory leaks, unit tests become an indispensable tool in a developer’s arsenal.
Regression Testing
Regression means “a return to a former or less developed state” and in the context of unit testing, it means going from a point where all your test pass, to a point when one or more does not. Regression Testing is running all the app tests you have developed in one go in order to determine that no regressions have happened. If they have we look to either reverse the changes we have made (which is where good use of source control can help) or to fix our implementation code such that all the test pass again.
Test-Driven Development (TDD)
Test-Driven Development (TDD) is “a software development process that relies on the repetition of a very short development cycle [where] requirements are turned into very specific test cases, then the software is improved to pass the new tests, only”. This contrasts with a non-TDD approach where code can be added which has not been proven to meet requirements. So in short, it’s an approach that starts with testing instead of starting with coding a solution and only then testing it.
The Software Engineer Kent Beck has been credited with having either “developed” or rediscovered the technique of TDD.
Elaborating further, TDD is based on the concept of RGR i.e Red, Green and Refactor:
- Red: The first thing we do is to write a failing test case.
- Green: Next we write the minimal code required in order to pass the test.
- Refactor: We can then refactor our code as required and our test code as well (then repeat).
Using XCTest with Swift
“A unit test is essentially just a function that invokes some of our code, and then asserts that the right thing happens. These functions are implemented within special classes called test cases, which – in the case of Xcode’s default testing framework, XCTest – are subclasses of XCTestCase“(Ref#: C).
How do we do Unit Testing in Swift?
Well, there are a number of different approaches, some of these use external unit testing frameworks and some use XCTest which is the unit testing that Apple gives us out of the box.
When using XCode, Unit Test will be run within a unit testing target. Whilst it is common practice to add this when creating a new project if you already have a project and wish to add a Unit Testing Bundle you can do this within XCode by choosing File > New > Target and selecting that option.
Given, When, Then
A common structure for our tests is Given, When, Then. This structure is commonly used in order to make our tests easier to debug and to read for other developers. It could be written in English as ”Given these conditions, when these actions are performed, then this is the expected outcome”(Ref#: C). This formula is also used when writing acceptance tests for user stories when using an Agile development approach. This particular approach was developed by Daniel Terhorst-North and Chris Matts originally as part of the Behavior-Driven Development (BDD) approach.
What do setUp and tearDown do?
Every time a test runs, both the setup and tear down functions are called.
“XCTest automatically calls setUp before running each test, which makes it an ideal place to reset our test case’s state and create fresh copies of any objects we need to run our tests”. setUp() happens before the test runs (it sets the test up).
Conversely tearDown() happens right after the test runs. We want to initialize the Classes which we want to test in the setup function, and we clear them out in the tearDown function. We want to have a clean baseline state for every new test that we run, and so every different function which is a test will have these functions called before it runs, and after it runs.
Unit Testing Asynchronous Code (How to test completion blocks)
“Tests execute synchronously because each test is invoked independently one after another. But more and more code executes asynchronously. To handle testing components that call asynchronously executing methods and functions, XCTest has been enhanced in Xcode 6 to include the ability to serialize asynchronous execution in the test method, by waiting for the completion of an asynchronous callback or timeout” (Ref#: I).
Expectations
XCTestExpectation[s] or expectation [s] in Swift are apples recommended way to test our asynchronous code. Sometimes we see things like semaphores (instances of DispatchSemaphore) used instead but it’s worth knowing that expectations are the preferred way.
|
1 2 3 4 5 6 7 8 9 10 11 12 13 14 15 16 17 18 19 20 21 |
func testFetchUserProfile() { // 1. Create an expectation let expectation = self.expectation(description: "Fetch user profile from network") // 2. Call the async method under test UserService.shared.fetchProfile(userID: "12345") { result in switch result { case .success(let profile): // 3. Perform your assertions inside the callback XCTAssertEqual(profile.id, "12345") XCTAssertNotNil(profile.name) case .failure(let error): XCTFail("Expected success, got error: \(error)") } // 4. Fulfill the expectation to let the test runner proceed expectation.fulfill() } // 5. Wait for expectations (with a timeout to avoid hanging forever) wait(for: [expectation], timeout: 5.0) } |
1. Create an XCTestExpectation with a descriptive label.
2. Invoke your asynchronous API, passing in a completion block.
3. Assert inside that completion block.
4. Fulfill the expectation when your async work is done.
5. Wait (serialize) by calling wait(for:timeout:), which blocks the test until either the expectation is fulfilled or the timeout elapses.
Inverted expectations
“An “inverted” expectation will fail if fulfilled. It is useful when testing mutually exclusive flows or simply when a given thing should happen with one configuration but not with another” (Ref#: O).
|
1 2 3 4 5 6 7 8 9 10 11 12 13 14 |
func testNoCallbackOnInvalidInput() { // 1. Create an expectation and invert it let expectation = self.expectation(description: "Completion should NOT be called") expectation.isInverted = true // 2. Call the async method with invalid input DataProcessor.shared.process(data: Data()) { success in // If this block ever executes, the expectation will be fulfilled—and thus fail expectation.fulfill() } // 3. Wait for a short period; we expect no fulfillment wait(for: [expectation], timeout: 1.0) } |
- By setting expectation.isInverted = true, XCT will fail the test if fulfill() is ever called.
- Use inverted expectations to guard against unwanted callbacks or to ensure certain code paths remain untriggered under specific conditions.
Dispatch queues
When your code dispatches work to different queues (background, main, custom), you still treat it as “async” in your tests and use expectations. You can also assert that callbacks happen on the queue you expect.
|
1 2 3 4 5 6 7 8 9 10 11 12 13 14 15 16 17 18 19 20 21 22 23 24 25 26 27 28 29 30 31 32 33 34 35 36 37 38 39 40 |
func testProcessOnBackground_thenMainQueueCompletion() { // Arrange let backgroundExpectation = expectation(description: "Background work should run off the main queue") let mainQueueExpectation = expectation(description: "Completion handler should run on the main queue") let testData = sampleData let expectedCount = testData.count * 2 // whatever your processing does // Inject custom queues (requires DataProcessor to support injection) let backgroundQueue = DispatchQueue(label: "com.myapp.tests.background", qos: .background) DataProcessor.shared.processingQueue = backgroundQueue DataProcessor.shared.completionQueue = .main // Optionally spy on the background step via a callback hook DataProcessor.shared.onBackgroundStep = { processed in // This should be off the main thread XCTAssertFalse(Thread.isMainThread, "Background step must not run on the main queue") XCTAssertEqual(processed.count, expectedCount, "Processed data length should match expectation") backgroundExpectation.fulfill() } // Act DataProcessor.shared.processOnBackground(data: testData) { result in // Assert XCTAssertTrue(Thread.isMainThread, "Completion handler must run on the main queue") switch result { case .success(let processed): XCTAssertEqual(processed.count, expectedCount, "Final processed data length should match expectation") case .failure(let error): XCTFail("Expected success but got error: \(error)") } mainQueueExpectation.fulfill() } // Wait for both background and main‐queue expectations wait(for: [backgroundExpectation, mainQueueExpectation], timeout: 2.0) } |
Key points:
-
Use separate expectations if you want to verify both “did run on the background queue” and “did come back on the main queue.”
-
Inside each async block you can assert
Thread.isMainThread(or its negation) to ensure you’re on the right queue. -
Always call
wait(for:timeout:)with all expectations you created.
MeasureBlock (measure how fast a function is running)
XCTest provides a built-in way to benchmark code snippets via measure (formerly measureBlock). It runs your block multiple times and reports average, standard deviation, etc., in the Test navigator.
|
1 2 3 4 5 6 7 8 9 |
func testSortingPerformance() { // This will automatically run ~10 iterations and record timing metrics self.measure { // Code under test let array = (1...10_000).shuffled() let sorted = array.sorted() XCTAssert(isSorted(sorted), "Array must end up sorted") } } |
If you need more control over which metrics to gather:
|
1 2 3 4 5 6 7 8 9 10 |
func testCustomMetrics() { let metrics: [XCTMetric] = [ XCTClockMetric(), // wall-clock time XCTCPUMetric() // CPU time ] measure(metrics: metrics) { // Code under test _ = fibonacci(20) } } |
Tips:
-
Keep each
measureblock focused on a single operation. -
Avoid side effects or shared state between iterations.
-
Use
baselinemeasurements (Xcode will prompt you) to track regressions over time.
testing Combine/async-await
XCTest Assertions
“Your test methods use assertions provided by the XCTest framework to present test results that Xcode displays. All assertions have a similar form: items to compare or a logical expression, a failure result string format, and the parameters to insert into the string format” (Ref#: I).
|
1 2 3 |
XCTAssertTrue(something == someOtherThing, "The things don't match) // There is also XCTAssertFalse, XCTAssertNil and many more which work as one might expect |
Mocking Objects
“Mocking is a key technique when it comes to writing unit tests in pretty much any language. When mocking an object, we are essentially creating a “fake” version of it – with the same API as the real one – in order to more easily be able to assert and verify outcomes in our test cases” (Ref#: F)
-Partial Vs Complete Mocking
“Mocking comes in two different flavors – partial and complete. When doing partial mocking, you are modifying an existing type to only partially behave differently in a test, while when doing complete mocking you are replacing the entire implementation” (Ref#: F).
Mocking with Protocols
Probably the best and more widely recommended method of Mocking in Swift is to make use of a combination of Protocols and Dependency Injection, which also helps us with transparency and separation of concerns as well as things like code readability.
Classes may often interact with other classes in our app or some SDK, and many “SDK Classes” can’t be directly created, a further challenge is that these classes may have delegate methods we want to test.
To solve this what we can do is to mock the interfaces of “external” classes using protocols.
An example we could use where we might be trying to mock the responses of CLLocationManager could look like this slide from a WWDC session:
CurrentLocationProvider and Protocol
|
1 2 3 4 5 6 7 8 9 10 11 12 13 14 15 16 17 18 19 |
class CurrentLocationProvider: NSObject { var locationFetcher: LocationFetcher init(locationFetcher: LocationFetcher = CLLocationManager()) { self.locationFetcher = locationFetcher super.init() self.locationFetcher.desiredAccuracy = kCLLocationAccuracyHundredMeters self.locationFetcher.delegate = self } } protocol LocationFetcher { var delegate: CLLocationManagerDelegate? { get set } var desiredAccuracy: CLLocationAccuracy { get set } func requestLocation() } extension CLLocationManager: LocationFetcher {} |
Description & Mocking Usage
Here, CurrentLocationProvider depends on the LocationFetcher protocol rather than the concrete CLLocationManager. By default it injects a real CLLocationManager, but in tests you can provide your own mock implementation.
Mock Implementation
|
1 2 3 4 5 6 7 8 9 10 11 12 13 14 15 16 17 18 19 20 21 22 23 24 25 26 27 28 29 30 |
// 1. Create a mock that conforms to LocationFetcher class MockLocationFetcher: LocationFetcher { var delegate: CLLocationManagerDelegate? var desiredAccuracy: CLLocationAccuracy = kCLLocationAccuracyBest var didRequestLocation = false func requestLocation() { didRequestLocation = true // Simulate a location callback after a short delay DispatchQueue.main.async { let fakeLocation = CLLocation(latitude: 51.5074, longitude: -0.1278) self.delegate?.locationManager?(CLLocationManager(), didUpdateLocations: [fakeLocation]) } } } // 2. Inject mock in your test func testCurrentLocationProviderRequestsLocation() { let mockFetcher = MockLocationFetcher() let provider = CurrentLocationProvider(locationFetcher: mockFetcher) // Kick off the location request provider.startUpdatingLocation() // assume this calls mockFetcher.requestLocation() // Assert that requestLocation() was invoked XCTAssertTrue(mockFetcher.didRequestLocation) // Optionally, wait for the simulated delegate callback and assert provider behavior } |
Why This Works
- The
LocationFetcherprotocol abstracts away the concreteCLLocationManager. - Your mock implements the same interface, so
CurrentLocationProvidercannot tell the difference. - You gain full control in tests: simulate success, failure, timing, and verify provider behavior without real GPS hardware or system prompts.
Dependency Injection
“…dependency injection is a technique whereby one object (or static method) supplies the dependencies of another object. A dependency is an object that can be used (a service). An injection is the passing of a dependency to a dependent object (a client) that would use it”(Wikipedia).
It’s really not complicated though, as it really just refers to “anytime you pass a value to a method or function”.
Why is Using D.I. Important?
How can We Use this in Swift?
|
1 2 3 4 5 6 7 8 9 10 11 12 13 14 15 16 17 18 19 20 21 22 23 24 25 26 27 28 29 30 31 32 33 34 35 36 37 38 39 40 41 42 43 |
//: ## Dependency Injection //: #### We have some service class Service class Service { func doSomething() { print ("hello") } } //: #### Client without DI class Client { let service: Service init() { service = Service() } func startSomething() { service.doSomething() } } // To use the above let client = Client() client.doSomething() //: #### Client with DI class DIClient { var service: Service // Our initializer injects our service, or there is a default init(service: Service = Service()) { self.service = service } func startSomething() { service.doSomething() } } let someService = Service() let dClient = DIClient(service: someService) dClient.doSomething() |
D.I. With View Controllers
|
1 2 3 4 5 6 7 8 |
init(networkingService: ITNetworkingEngine) { self.networking = networkingService super.init(nibName: nil, bundle: nil) } required init?(coder aDecoder: NSCoder) { fatalError("init(coder:) has not been implemented") } |
What are Dependency Injection Frameworks and How Can We Use Them?
If we’re looking for a different system to help us implement D.I. in our swift apps, we might turn to a D.I. framework; examples of D.I. frameworks include Cleanse, Swinject, and Needle.
- Cleanse (https://github.com/square/Cleanse)
- Swinject (https://github.com/Swinject/Swinject)
- Needle (https://github.com/uber/needle) – this is Über’s attempt at a D.I. framework and aims to replicate some of the approaches they use in-house in parallel with their distinctive design patterns.
Code Coverage
**How do we check code coverage?**
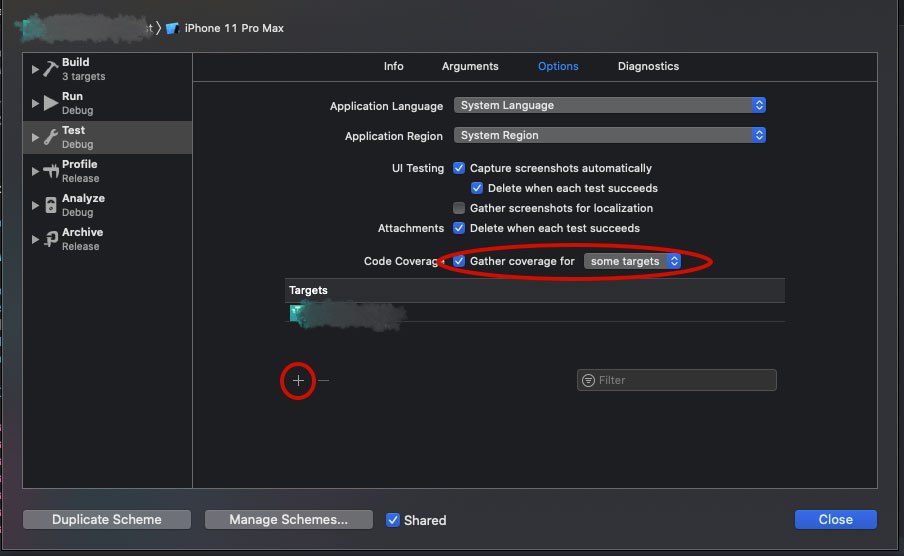
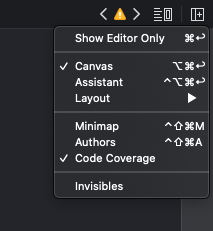
Well from XCode 9.2 onwards code coverage tools have been improved. We can check code coverage with scripts in the command line by using **xccov**, or we can use the build-in features of Xcode by first selecting **Editor -> Show Code Coverage**, and also editing our scheme and under the “Test” section make sure that “Code Coverage” is checked (we can also select which targets are covered here). We can hit cmd U to rerun our test and enter the Report Navigator to view the results.
We run our test and then we can view our code coverage report right inside XCode and get a percentage of the estimated code coverage by our current set of unit tests. Expanding out the result, we can tap through to the individual source files and see a visual representation of code coverage there on the right-hand side of our source code. We can usually just take this a just a general guide as we need to manually judge what makes sense to test and what does not to an extent.
Updated Method ->
In order to enable coverage reports, you should edit your debug scheme options. You can restrict the coverage report to your main app by using the “Gather coverage for” option and add your main add using the plus button.
Run all your app tests with Command+U
Go to the report navigator and view the percentage coverage by file.
See the Code Coverage in Each File
Entering each file, enable Code Coverage display, and then the sections tested and untested are highlighted for you via a panel on the right of the code.
Test Selection & Ordering
From XCode 10 onwards we can now more easily select & order our test.
We can use Test Selection with our Schemes deciding which “tests to skip”
We have the option of making a new test we add opt-in tests such that we can choose whether to automatically add new tests to the set of tests we execute or not.
Test Ordering used to be just alphabetical, but this meant that there could be order effects if individual tests did not always correct setup and tare-down their state. However, in Xcode 10 we do not have the option to randomize the order in which our tests execute to hopefully account for cases where the order of test is having unforeseen side effects.
Parallel Testing
With XCTest we can talk about two kinds of parallel testing:
- Parallel Destination Testing
- Parallel Distributed Testing
Parallel Destination Testing has been around for a while where we can (from the command line) test and run concurrently on different destinations, where a destination is like a device or a simulator (something mostly useful in CI scenarios like where we are using a Jenkins pipeline).
Parallel Distribution Testing, in contrast, is a slightly newer technique that now allows us to run multiple tests on a single destination (like a single sim). This testing is often class-based (it separates out a test based on the tested class), and works through a complex process explained in this apple talk: …
iOS Testing Pyramid / The Pyramid of Tests
At WWDC 2017, Apple introduced us to their “Pyramid of Tests” which is a suggested structuring for a test suit for our app.
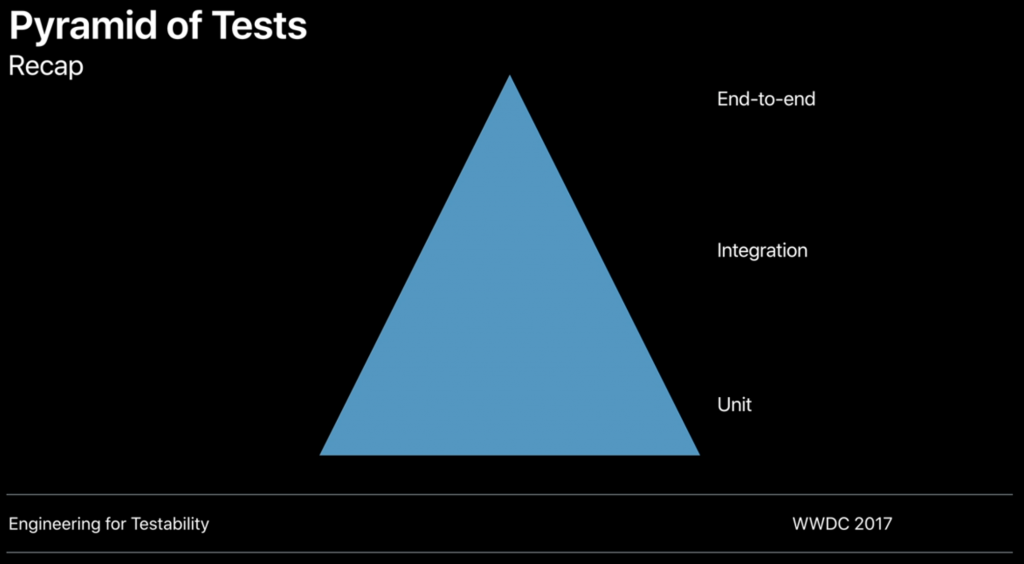
This “Pyramid of Tests” approach advocates that our test suite is bottom heavy – or in other words it is made up of mainly smaller unit test (testing a lot of the discrete functions etc in our app), then at the middle level we have Integration Tests (about how things are working together for a purpose), and at the top a very few “end-to-end” test by which Apple is mainly talking about things like UI test of typical things a user might do.
Conclusion
In summary, unit testing is far more than a simple checkbox; it is a mindset that drives design, safeguards against regression, and accelerates development through clear, isolated feedback. By combining synchronous assertions, asynchronous expectations, performance benchmarks, mocking strategies, and dependency injection, a well-crafted test suite empowers teams to evolve code confidently. Embracing TDD, leveraging XCTest’s tooling, and regularly measuring coverage and performance ensures not only higher quality but also faster, safer innovation throughout the software lifecycle.
In this article we have outlined some of the basic topic in using unit testing in the context of Swift programming to enhance code quality and robustness.
References
A: https://medium.com/swift-india/test-driven-development-developers-magic-wand-b81cfbfeee99
B: https://en.wikipedia.org/wiki/Test-driven_development
C: https://www.swiftbysundell.com/basics/unit-testing
D: https://www.swiftbysundell.com/posts/refactoring-swift-code-for-testability
E: https://www.swiftbysundell.com/posts/unit-testing-asynchronous-swift-code
F: https://www.swiftbysundell.com/posts/mocking-in-swift
G: https://clean-swift.com/step-by-step-walkthrough-of-ios-test-driven-development-in-swift/
H: https://www.appcoda.com/tdd-quick-nimble/
I: https://developer.apple.com/library/archive/documentation/DeveloperTools/Conceptual/testing_with_xcode/chapters/04-writing_tests.html
J: http://www.getlaura.com/testing-unit-vs-integration-vs-regression-vs-acceptance/
K: https://github.com/uber/needle
L: https://qualitycoding.org/swift-mock-objects/
M: https://www.youtube.com/watch?v=XhuosoIrRqE
N: https://www.guru99.com/component-testing.html
O: https://medium.com/blablacar-tech/4-tips-to-master-xctestexpectation-aee2b2631d93
![]()
Comments